10 Best Tools for Base Application (2026): Sponges and Brushes Compared
Foundation, tinted moisturiser and concealer can look completely different depending on what you use to put them on. The same bottle can look sheer with one tool and full and polished with another. This list covers 10 options, from dense kabuki brushes to blending sponges and starter sets.
Part of our guide to makeup tools. Start with: 10 Best Makeup Brush Sets (2026): Soft, Well-Made Kits for Every Look
The best tool for base application depends on the finish you want. A damp makeup sponge gives the most natural, sheer, skin-like finish and is forgiving for beginners. A dense foundation brush, such as a flat-top or kabuki brush, gives more coverage and a smooth, airbrushed look, and uses less product than a sponge. Fingers are quickest, warm the product so it melts in and suit light formulas such as tinted moisturiser, BB cream and concealer. Many people combine them: brush on, then press with a damp sponge. Whatever you choose, clean it often, because dirty tools cause streaks and can irritate skin.
In short: use a sponge for a natural finish, a brush for coverage and fingers for speed and light formulas.
The American Academy of Dermatology notes that acne-prone skin does best with gentle care and non-comedogenic makeup, and keeping applicators clean is part of that routine.
Below you will find the ten picks, how we chose them, a side-by-side comparison of sponges, brushes and fingers, how to use each one well, which tool suits your skin type and how often to clean them.
Shopping these picks?
Amazon Prime members get fast, free shipping on eligible items, plus Prime Video, Amazon Music and member deals. New members can start with a free trial.
Start a free Prime trialAged 18 to 24? Prime for Young Adults comes with a longer free trial and a lower price after it.
Affiliate link: we may earn a commission at no extra cost to you.
As an Amazon Associate we earn from qualifying purchases. This does not change which products we include.


Quick Answer
- The BK Beauty 101 brush is our top pick for streak-free coverage and a design aimed at mature skin.
- The Jessup set is the best starter kit, with double-ended brushes and two sponges.
- The Sigma F80 is the pro-grade flat kabuki for fuller, buffed coverage.
- A damp sponge gives the most natural, sheer finish.
- A dense brush gives more coverage and uses less product.
- Fingers are fast and suit light formulas and concealer.
- Clean sponges and brushes regularly to avoid breakouts and streaks.
On This Page
- The 10 Best Tools for Base Application Right Now
- How We Chose These Products
- Sponge vs Brush vs Fingers at a Glance
- Makeup Sponges: The Natural, Forgiving Option
- Foundation Brushes: More Coverage, Less Product
- Fingers: The Quick, Low-Waste Option
- Which Tool Works Best With Each Formula
- How to Apply Foundation With Each Tool
- How to Clean Sponges and Brushes
- Best Tool for Your Skin Type
- Dos and Don’ts
- Honest Limits
- When to See a Dermatologist
- FAQ
- The Bottom Line
The 10 Best Tools for Base Application Right Now
These ten foundation brushes, sponges and sets were shortlisted from widely reviewed Amazon listings and ranked by fibre or foam quality, shape, versatility and how clearly each listing explains its use. Each pick shows who it suits, its trade-offs and who should skip it.
| # | Product | Best For | Standout Feature | |
|---|---|---|---|---|
| 1 | BK Beauty 101 Contoured Foundation Brush | Liquid and cream base, including mature skin | Contoured head for streak-free coverage | View |
| 2 | Jessup T510 Brush and Sponge Set | Beginners building a base kit | Double-ended brushes plus two sponges | View |
| 3 | Sigma Beauty F80 Flat Kabuki Brush | Fuller coverage with liquid and cream | Dense flat kabuki for buffed coverage | View |
| 4 | Laura Geller Retractable Angled Kabuki Brush | Touch-ups on the go | Retractable angled head for your bag | View |
| 5 | beautyblender Original Makeup Sponge | A natural, skin-like finish | The original super-soft blending sponge | View |
| 6 | DUcare Large Flat Top Kabuki Brush (3-Pack) | Spares for daily use and body | Three large dense flat top brushes | View |
| 7 | e.l.f. Total Sponge Set | Foundation, concealer, contour and baking | Several sponge shapes for different jobs | View |
| 8 | Keshima Retractable Flat Top Kabuki Brush | Small bags and quick touch-ups | Portable retractable flat top | View |
| 9 | DPOLLA Foundation and Concealer Brush Set | Foundation plus spot concealing | Matching foundation and concealer brushes | View |
| 10 | AOA Studio Latex-Free Sponge Set (6-Pack) | Frequent sponge users on a budget | Six latex-free sponges to rotate | View |
BK Beauty 101 Contoured Foundation Brush

Best for: Liquid and cream base, including mature skin
The BK Beauty 101 brush earns the top spot because it is designed for the job most people struggle with: getting liquid or cream foundation even without streaks. Its listing describes ultra-soft synthetic fibres on a contoured head for an airbrushed-looking finish, and says it is specially designed with mature skin in mind, where texture and fine lines show every stroke.
The listing also says the brush absorbs little product, so more foundation ends up on the skin. It is vegan and cruelty-free. As a single brush it does less than the Jessup set, and it is not as forgiving as a damp sponge like the beautyblender if you tend to apply too much.
- Ultra-soft synthetic fibres
- Contoured head for liquid and cream
- Designed with mature skin in mind
- Absorbs little product
Pros
- Streak-free, even finish
- Wastes little foundation
- Suits textured or mature skin
Cons
- Single brush only
- Less forgiving than a damp sponge
Skip it if: Skip it if you only wear powder; a fluffy powder brush is a better match.
Check Price on AmazonJessup T510 Brush and Sponge Set

Best for: Beginners building a base kit
The Jessup set is the easiest way to get a complete base kit in one box. Its listing describes three double-ended face brushes with soft synthetic bristles, so six brush heads in total, plus two sponges, including a sculpting sponge shaped for concealer and contour. It arrives in a gift box.
Double-ended brushes save space but can be awkward to clean and dry, because both ends need attention. The individual brushes are not as specialised as the dense Sigma F80 for full coverage, but for someone still working out whether they prefer a brush or a sponge, having both is genuinely useful.
- Three double-ended synthetic face brushes
- Two sponges included
- Sculpt sponge for concealer and contour
- Gift box packaging
Pros
- Brushes and sponges in one kit
- Good for trying different tools
- Makes a tidy gift
Cons
- Double-ended brushes are fiddly to clean
- Less specialised than single pro brushes
Skip it if: Skip it if you already know your favourite tool; a single dedicated brush or sponge is better value.
Check Price on AmazonSigma Beauty F80 Flat Kabuki Brush

Best for: Fuller coverage with liquid and cream
The Sigma F80 comes from a well-known professional brush brand, and it is our pick for anyone who wants buffed, fuller coverage. Its listing describes a dense, flat kabuki head made from SigmaTech synthetic fibres for a smooth, even-looking complexion with liquid and cream foundation, on a durable, waterproof handle.
Dense flat brushes put more product on the skin than a damp sponge, so start with less foundation than you think. The listing says it is suitable for beginners and professionals and is easy to wash. It is less soft and forgiving than the #1 pick on dry or textured skin, where buffing can catch flakes.
- Dense flat kabuki head
- For liquid and cream foundation
- SigmaTech synthetic fibres, waterproof handle
- Easy to wash
Pros
- Buffs to a smooth, full finish
- Durable build
- Well-known professional brand
Cons
- Can emphasise dry patches if overworked
- Uses more product than a sponge
Skip it if: Skip it if you want a sheer, skin-like finish; a damp sponge suits that better.
Check Price on AmazonLaura Geller Retractable Angled Kabuki Brush

Best for: Touch-ups on the go
The Laura Geller retractable kabuki is the pick for travel and touch-ups. Its listing describes no-shed, vegan bristles on an angled kabuki head that retracts into its handle, which protects the fibres and keeps foundation off the rest of your bag. It is designed for liquid, cream and powder products.
The angled shape helps reach around the nose and along the jaw. Retractable brushes are harder to wash and dry thoroughly than open ones, so clean it often and let it dry fully before closing. It is smaller than the Sigma or DUcare brushes, so full-face application takes a little longer.
- No-shed vegan bristles
- Retractable, travel-friendly design
- Angled kabuki head
- For liquid, cream and powder
Pros
- Protects bristles in a bag
- Versatile across formulas
- Angle reaches tricky areas
Cons
- Harder to dry thoroughly
- Slower for full-face application
Skip it if: Skip it if you rarely do touch-ups away from home; an open brush is easier to keep clean.
Check Price on Amazonbeautyblender Original Makeup Sponge

Best for: A natural, skin-like finish
The beautyblender is the original teardrop sponge and our pick for the most forgiving, natural finish, especially for beginners. Its listing describes super-soft, latex-free foam that expands when damp for controlled, buildable application of foundation, powder and cream, and says it is designed to absorb less product than typical sponges.
It is washable, reusable, vegan and cruelty-free, and works with most foundation textures. The trade-off is that sponges need frequent cleaning and eventually tear or stain, so they must be replaced more often than brushes. For a similar shape in a multi-pack, the AOA set is a lower-commitment option, though its listing is less detailed.
- Super-soft, latex-free foam
- Expands when damp for buildable application
- Designed to absorb less product
- Washable, reusable and vegan
Pros
- Very forgiving natural finish
- Works with liquid, cream and powder
- Latex-free
Cons
- Needs frequent cleaning
- Must be replaced more often than a brush
Skip it if: Skip it if you dislike washing tools often; a synthetic brush is lower maintenance.
Check Price on AmazonDUcare Large Flat Top Kabuki Brush (3-Pack)

Best for: Spares for daily use and body
The DUcare three-pack gives you spare foundation brushes, so one can dry fully after washing while you use another. Its listing describes a large, dense flat head that works as a buffing and blending brush, suitable for powder, liquid and cream, and says each brush goes through a seven-step process to reduce shedding.
The large head covers the face quickly and also suits body products, but it is less precise around the nose and eyes than the angled Laura Geller brush or the DPOLLA concealer brush. For people who wash brushes often, having three in rotation is practical, hygienic and saves waiting for one to dry.
- Large, dense flat top head
- For powder, liquid and cream
- Made to resist shedding
- Pack of three
Pros
- Spares for rotation while drying
- Quick full-face coverage
- Versatile across formulas
Cons
- Large head is less precise
- Three of the same brush may be more than you need
Skip it if: Skip it if you only need one brush; the Sigma F80 or BK Beauty brush is a better single choice.
Check Price on Amazone.l.f. Total Sponge Set

Best for: Foundation, concealer, contour and baking
The e.l.f. Total Sponge Set is the most versatile sponge option on this list for people who do more than foundation. Its listing describes a complete set of blending sponges in different shapes and sizes, including a Total Face Sponge for all-over foundation, smaller shapes for hard-to-reach areas such as under the eyes, and a pyramid sponge for contour and baking.
Having shapes for each job helps if you use concealer and contour as well as foundation. The downside is that more sponges means more to wash and dry, and all of them need replacing over time. For a single, simple sponge that is quicker to look after, the beautyblender is the easier choice.
- Set of blending sponges in several shapes
- Shapes for hard-to-reach areas
- Total Face Sponge for foundation
- Pyramid sponge for contour and baking
Pros
- A shape for every base step
- Good for concealer under the eyes
- Well-known affordable brand
Cons
- More sponges to clean
- All need regular replacement
Skip it if: Skip it if you only wear foundation; one good sponge is enough.
Check Price on AmazonKeshima Retractable Flat Top Kabuki Brush
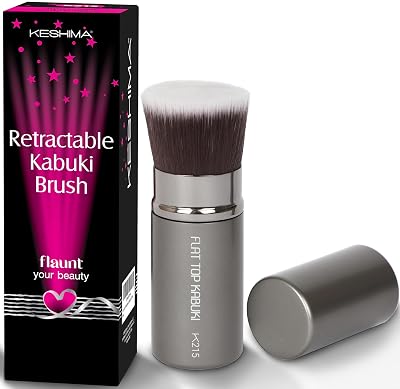
Best for: Small bags and quick touch-ups
The Keshima retractable brush is a simpler, compact alternative to the Laura Geller pick for people who carry makeup every day. Its listing describes a pro flat top kabuki that retracts into a portable case, which protects the bristles and keeps foundation off the inside of a bag, making it handy for work, gym or travel touch-ups.
The flat top suits buffing liquid or cream foundation into the skin, but the listing gives few details about the fibres or size, so check the product photos before buying. As with any retractable brush, wash it often and let it dry fully open before closing it, which keeps it hygienic.
- Flat top kabuki head
- Retractable design
- Portable for bags and travel
- For buffing base products
Pros
- Compact and protected
- Good for touch-ups
- Flat top buffs evenly
Cons
- Few fibre details on the listing
- Retractable design is slower to dry
Skip it if: Skip it if you want an angled head; the Laura Geller brush reaches around the nose more easily.
Check Price on AmazonDPOLLA Foundation and Concealer Brush Set
Best for: Foundation plus spot concealing
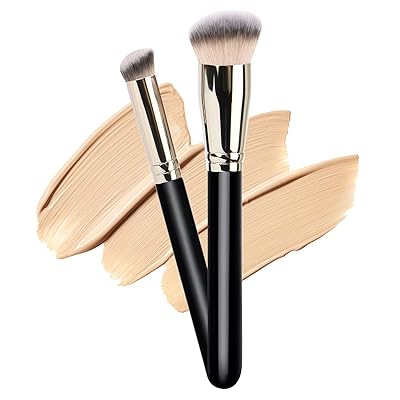
The DPOLLA set pairs a foundation brush with a smaller concealer brush, which covers the two main base steps with a matching pair of tools. A small concealer brush is useful for dabbing product onto blemishes or redness precisely, where a large kabuki or sponge would spread it too widely.
The listing is short and gives few details about bristle type or head shape, so check the photos to make sure the foundation brush style suits you. It is less specialised than the Sigma F80 for full coverage, but a practical, widely reviewed pair for people who conceal spots as well as wearing foundation.
- Foundation brush
- Concealer brush
- Matching pair for base steps
- Suits liquid and cream products
Pros
- Covers foundation and concealer
- Precise concealer application
- Widely reviewed
Cons
- Short listing with few specifications
- Only two brushes
Skip it if: Skip it if you never use concealer; a single foundation brush is enough.
Check Price on AmazonAOA Studio Latex-Free Sponge Set (6-Pack)

Best for: Frequent sponge users on a budget
The AOA Studio set is the budget choice for people who love sponges but go through them quickly. Its listing describes a set of six latex-free makeup sponges, which lets you use a fresh one while others are drying and replace worn ones without worry. It is one of the most widely reviewed sponge sets available.
The listing is short, so it does not describe the foam in the detail the beautyblender listing does. Latex-free foam is helpful for anyone with a latex sensitivity. Rotating several sponges is also more hygienic than reusing one damp sponge every day, because each has time to dry fully between uses.
- Six makeup sponges
- Latex-free foam
- Suits foundation and concealer
- Easy to rotate and replace
Pros
- Plenty of spares
- Latex-free
- Widely reviewed
Cons
- Short listing with little detail
- Softness may differ from premium sponges
Skip it if: Skip it if you prefer one premium sponge; the beautyblender is the softer choice.
Check Price on AmazonHow We Chose These Products
We shortlisted foundation brushes and sponges from Amazon listings that are highly rated by a large number of shoppers, favouring established beauty brands and fuller-featured tools with clear descriptions of fibres, foam and shape. We then checked each product’s listed features against the hygiene and skin guidance cited in this post, including advice on cleaning tools and avoiding breakouts.
These are research-based picks, not hands-on lab tests. We did not apply foundation with each tool ourselves, so rankings reflect listing detail, design and versatility rather than personal results. We left out powder-only brush sets and large mixed kits so the list stays focused on applying base.
- Strong ratings from a large number of shoppers
- Established brands and fuller-featured tools preferred
- Listed features checked against the cited hygiene guidance
- Powder-only and oversized mixed kits excluded
- No more than two picks per brand
Sponge vs Brush vs Fingers at a Glance
Each tool changes how much product reaches the skin and how it is spread. This table sums up the main differences so you can choose by the finish you want.
| Feature | Damp sponge | Foundation brush | Fingers |
|---|---|---|---|
| Finish | Natural, skin-like, soft | Smooth, polished, airbrushed | Natural, slightly sheer |
| Coverage | Sheer to medium | Medium to full | Sheer to light |
| Product used | More (sponge absorbs some) | Less | Least |
| Speed | Moderate | Moderate to fast | Fastest |
| Ease for beginners | Very forgiving | Takes practice | Easy but can be uneven |
| Best formulas | Liquid, cream, concealer | Liquid, cream, stick | Tinted moisturiser, BB cream, cream products |
| Streak risk | Low | Higher if brush is flat or dirty | Low to moderate |
| Cleaning | After every few uses | Weekly for foundation brushes | Wash hands before use |
There is no single winner. Most makeup artists keep all three options and choose depending on the formula and the look. For everyday wear, a sponge or fingers is often enough; for events, photos or more coverage, a brush usually does a better job.
Makeup Sponges: The Natural, Forgiving Option
Sponges became popular because they press product into the skin rather than painting it on top. That makes foundation look closer to real skin and hides the edges that brushes can leave.
- Dampen the sponge and squeeze out all excess water so it is springy, not dripping.
- Bounce or press the sponge against the skin rather than wiping it.
- Use the pointed tip for around the nose and under the eyes and the rounded side for cheeks.
- Expect to use slightly more product, because a sponge absorbs some foundation.
- Use a clean, damp sponge at the end to soften any heavy areas.
Using a sponge dry gives more coverage but can look patchier. Our guide on whether you are supposed to wet makeup sponges explains why a damp sponge usually gives a smoother finish.
Foundation Brushes: More Coverage, Less Product
Brushes spread product efficiently and give the most control over coverage. They come in several shapes, and the shape changes the finish.
| Brush type | Finish | Best use |
|---|---|---|
| Flat-top or kabuki | Dense, buffed, airbrushed | Liquid and cream foundation, medium to full coverage |
| Flat paddle | Smooth, can streak | Thin liquid foundations, quick application |
| Stippling (duo-fibre) | Light, airy, diffused | Sheer coverage, dewy looks |
| Angled or oval | Precise, even | Around the nose and jaw, contour |
| Small concealer brush | Targeted | Spots, under-eyes, around the mouth |
Apply foundation in small dots, then buff in small circles or stipple for a lighter finish. Brushes can leave faint lines on dry areas, so many people finish by pressing a damp sponge over the top.
Fingers: The Quick, Low-Waste Option
Fingers are underrated. Body heat warms the product so it melts into the skin, and nothing is wasted in a tool. They work especially well for light formulas and for concealer on small areas.
- Wash your hands before applying makeup.
- Warm a small amount between your fingertips before pressing it on.
- Tap and press rather than rub to avoid streaks and patchiness.
- Use the ring finger for the gentlest pressure under the eyes.
- Switch to a tool for full coverage, since fingers rarely build it evenly.
Fingers suit tinted moisturiser and BB cream in particular. Our guide on how to apply BB cream shows the finger method step by step.
Which Tool Works Best With Each Formula
The formula you use can be as important as your preference. Some products simply behave better with one tool than another.
- Thin or serum-like foundation: fingers or a stippling brush keep it light.
- Medium liquid foundation: a damp sponge or kabuki brush both work well.
- Full-coverage or long-wear foundation: a dense brush to buff, then a sponge to press, because these set quickly.
- Cream or stick foundation: a dense brush or damp sponge to blend edges.
- Tinted moisturiser and BB cream: fingers or a damp sponge.
- Concealer: fingertip or a small brush for spots, sponge tip for under-eyes.
Long-wear and matte foundations set quickly, so work on one area of the face at a time. Waiting too long before blending leaves visible edges that no tool can fully fix.
How to Apply Foundation With Each Tool
These steps work for any liquid foundation. Choose the tool step that matches what you have.
Prep the skin
Moisturise and apply sunscreen, then wait a few minutes so they settle.
Start with less product
Place a few small dots on the centre of the face.
Sponge method
Bounce a damp sponge outwards from the centre, pressing product into the skin.
Brush method
Buff in small circles with a dense brush, working outwards.
Finger method
Warm product between fingertips and press it outwards.
Blend the edges
Fade product at the hairline, jaw and ears so there is no line.
Build only where needed
Add a second thin layer or concealer on areas that need more coverage.
Finish with a sponge press
Press a clean damp sponge over the face to remove streaks and excess.
If your foundation always looks streaky with a brush, try adding one drop of moisturiser or primer to it first, or switch to a denser brush. Streaks usually mean the brush is too flat, too sparse or not clean enough.
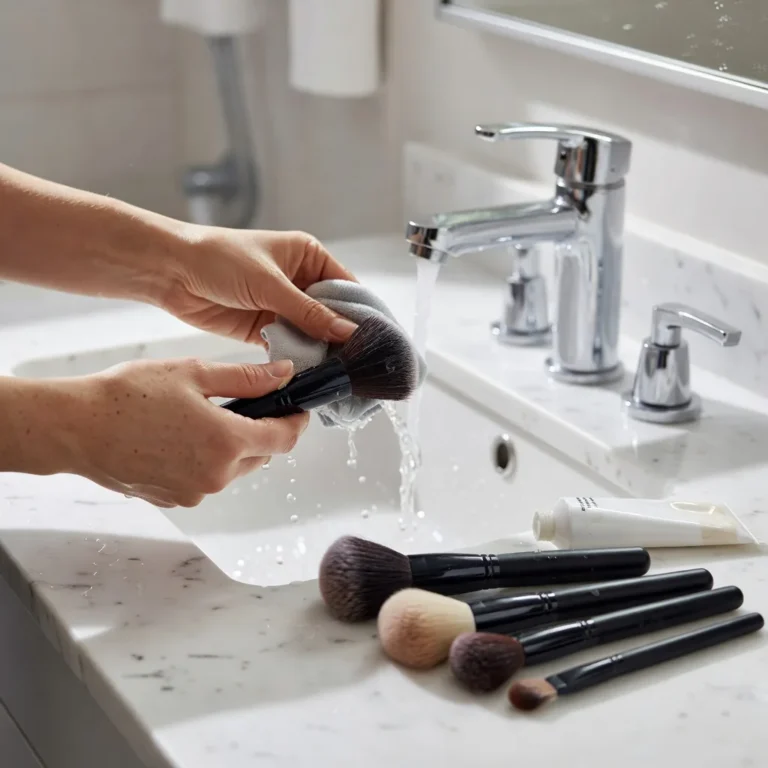
How to Clean Sponges and Brushes
Dirty tools are one of the most common reasons makeup looks streaky or patchy. They can also hold oil, dead skin and bacteria against the skin.
- Rinse sponges under warm water, massage in a gentle soap or cleanser and squeeze until the water runs clear.
- Wash foundation brushes by swirling the bristles in soapy water, pointing downwards so water does not reach the glue.
- Rinse thoroughly and squeeze out excess water.
- Dry sponges in open air and brushes flat or bristles down, not upright.
- Clean sponges after every few uses and foundation brushes at least weekly.
- Replace sponges when they tear, crumble, smell or stay stained.
Our guide on how often makeup brushes need to be cleaned gives a full cleaning schedule for each type of brush.
Do not share sponges or brushes, and never keep a damp sponge sealed in a bag or case. A warm, wet sponge is an easy place for mould and bacteria to grow, which can irritate skin or cause breakouts.
Best Tool for Your Skin Type
Your skin type changes how each tool behaves. A tool that gives a flawless finish on oily skin can catch on dry patches, and the reverse is also true.
- Dry or flaky skin: a damp sponge or fingers, since brushes can lift flakes and emphasise texture.
- Oily skin: a dense brush to buff a thin layer, followed by a light sponge press to remove excess.
- Combination skin: a damp sponge all over, with a brush on areas that need more coverage.
- Mature skin: fingers or a damp sponge for thin layers that do not settle into lines.
- Acne-prone skin: clean tools every time, and press rather than drag over active spots.
- Sensitive skin: soft synthetic brushes or fingers, and avoid rough or old sponges.
If you are acne-prone, the AAD’s acne tips recommend gentle care and makeup labelled non-comedogenic, and rubbing or scrubbing the skin can make breakouts worse. Pressing product on with a clean tool is kinder than dragging a brush back and forth over inflamed spots.
Texture matters as much as skin type. Large pores and uneven texture often look smoother when foundation is pressed in with a sponge, while a brush can buff product into the surface but also highlight dry edges. Testing both on the same day, one on each side of the face, is a quick way to see which suits you. Check the result in daylight after a few hours, since some finishes look fine at first and only show streaks or patchiness later.
Dos and Don’ts
Try This
- Use a damp sponge for a natural finish
- Use a dense brush for more coverage
- Wash your hands before using fingers
- Clean tools regularly
- Let sponges and brushes dry in open air
Avoid This
- Drag a sponge across the skin
- Use a dirty or crusty brush
- Store damp sponges in a closed case
- Share makeup tools
- Keep using a torn or smelly sponge
Honest Limits
No tool can fix a foundation that is the wrong shade, the wrong finish or too heavy for your skin. Tools change how product lies on the skin, but they cannot change its colour or make a very matte formula look dewy.
Price is also not a reliable guide to quality. Many inexpensive sponges and synthetic brushes work well, and an expensive tool that is not cleaned will still give a patchy finish. Which tool looks best is partly personal, so it is worth trying more than one before deciding what suits your skin.
When to See a Dermatologist
- You break out often where you apply makeup, even with clean tools.
- Your skin stings, itches or turns red after using a new sponge or brush.
- You have eczema, rosacea or very sensitive skin that reacts to friction.
- You notice an infection, such as crusting or painful spots, after makeup use.
This article is for general information and does not replace professional medical advice. Patch test new makeup, keep tools clean, and see a board-certified dermatologist if you have persistent breakouts, irritation or signs of infection.
FAQ
Which base application tool on this list is best overall?
The BK Beauty 101 brush, for soft, streak-free coverage.
Is a sponge or brush better for foundation?
A sponge is more forgiving; a brush gives more coverage.
Is it bad to apply foundation with fingers?
No, as long as your hands are clean.
Which sponge is best for foundation?
The beautyblender for the softest blend, or the AOA set for more spares.
Should a makeup sponge be wet or dry?
Damp for a natural finish, dry for more coverage.
Which brush is best for liquid foundation?
A dense flat-top or kabuki brush.
Why does my foundation look streaky?
A flat or dirty brush, too much product or dry skin.
How often should I clean a makeup sponge?
Every few uses, and replace it when it tears or smells.
Is the most expensive foundation brush worth it?
Sometimes; the Sigma F80 lasts well, but DUcare or Keshima brushes cover basics.
Can I use a brush and sponge together?
Yes, brush on and press with a damp sponge.
The Bottom Line
The best tools for base application are the ones that match the finish you want: a damp sponge for natural skin, a dense brush for coverage and fingers for speed and light formulas.
Combine tools for a smoother result, choose the tool that suits your formula and clean everything regularly so your base goes on evenly and your skin stays calm.
Our top pick: BK Beauty 101 Contoured Foundation Brush
The BK Beauty 101 brush takes the top spot because its contoured, soft synthetic head is designed for streak-free coverage with little product wasted, and it is made with mature skin in mind, which suits the widest range of base users. Choose the beautyblender instead if you want the most forgiving, natural finish, or the Sigma F80 if you prefer a dense flat kabuki for fuller coverage.
Check Price on Amazon
Written by
Registered pharmacist and founder of Facial Adviser. Rakib's pharmacy training covers how skincare actives work and interact; a later course in cosmetology turned that into a focus on facial treatments and skincare products. He plans, researches and edits every guide on the site and checks health claims against sources such as the American Academy of Dermatology, the FDA and the NIH. He is not a dermatologist; see the Editorial Policy and Medical Disclaimer.
About · Editorial policy · How we choose products · Medical disclaimer · Contact
Keep reading: Makeup brushes and tools
- 10 Best Makeup Brush Sets (2026): Soft, Well-Made Kits for Every Look
- Makeup Storage Temperature Tips: How Heat, Cold and Humidity Affect Makeup
- Are You Supposed to Wash Makeup Brushes Before Using Them?
- How Often Do Makeup Brushes Need to Be Replaced?
- Are You Supposed to Wet Makeup Sponges? When, How, and Why
- Best Way to Dry Makeup Brushes: Flat, Angled Down and Never Upright